Lab: Exploring the Rate of Photosynthesis - Teacher's Guide
I have the most success using 1200 Lumen compact fluorescent bulbs. Incandescent bulbs really don't work well, but can serve if that's all you have. CFL's are really cheap now, I have bought a pack of four for a $1.00 at Home Depot if you watch for the sales. Another cheap way to set up the lab is to buy "Outlet-to-Socket" light plugs, and you can just plug the bulbs into an extension cord and hang them from ring stands. In the set-up below the light is attached to an extension cord which was clipped to a ring stand.
Also, keep in mind this in an inquiry lab, so sometimes its best to only give students minimal instructions about the set up and let them come up with a design. This can take longer and be somewhat stressful for students who are used to recipe style labs, but inquiry and problem solving are part of Next Generation Science Standards and a core part of the AP Biology curriculum. Allow students to come up with designs and help them trouble shoot any problems with their designs.


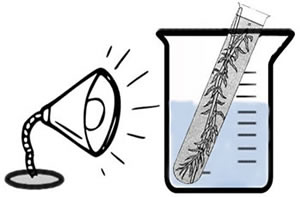
Design 1 - Preferred

Heat sinks (beaker with water) may not be necessary if using CFL bulbs. Count the bubbles to measure the rate of reaction.
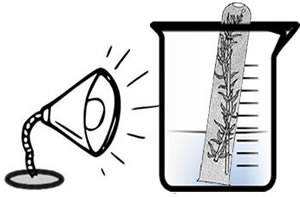
Design 2

The test tube can be inverted and the air pocket can be measured.A marker can be used to measure the amount of oxygen in the test tube rather than measuring bubbles.
If students cannot get bubbling to work, you can use this method as a last resort and leave the apparatus set up until the next day. The amount of oxygen that collects at the top of the tube can be used to measure oxygen produced.
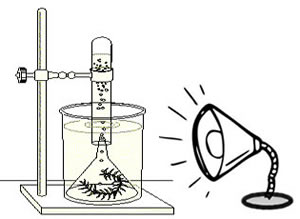
Design 3

This one requires more equipment, but can reduce some errors.
Part 2: Conditions for Photosynthesis
Students should have come up with a test the day before and verified it with the instructor, this gives you a day to gather any materials they might need.
Common variables that students choose to test:
Light color - be careful using colored fluorescent bulbs, these do not work, instead try using cellophane or velum to serve as a light filter
Light intensity - provide different sizes of bulbs, or students can experiment with moving the bulbs farther away from the plants
Temperature - ice and warm water baths can be provided
Part 3: Carbon Dioxide Use - This was removed from student worksheet, but it can be an interesting demo. Timing is very important to get the desired results.
Phenol red is used as an indicator for a base. With excess carbon dioxide, the phenol red will be yellow, as the carbon dioxide is removed, the solution becomes more basic, turning back to red.
This can be a difficult part of the lab to coordinate because timing is important. I've used 10 ml of phenol red to 200 ml of water. The yellow water starts to change to pink in about an hour, with the most spectacular results in about 3 hours. If left overnight, the pink will go away and the vial will return to yellow (due to respiration). If possible, ask students to come in later in the day to note any color change. If this is not possible you can perform this as a demo by setting up the vials beforehand and taking photos, or just use the photos below.
Phenol Red after 3 hours stored in light.
Phenol Red after 3 hours stored in dark
You may encounter a lot of errors an anomolous results, so remind students that it's not always about the data gathered, but the path taken, the design and the exploration. Alleviate fears that they will be penalized if their data doesn't conform with what is expected, and instead encourage them to explain their results and include any design problems.

